geeyoutoo
Members
-
Joined
-
Last visited
Everything posted by geeyoutoo
-
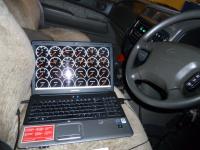
Yes, very simple to setup, I had some difficulties getting it setup on the laptop with com ports, but computers and I have a very difficult relationship sometimes. When doing this you need to have the USB icon marked in the menu, you will see it as you scroll through. We know now that somewhere in late 2003 there was a change in the ECU that made the ECUTalk show a boost reading, it took the place of fan on/off on earlier DI's. Yes, you can cancel fault code after reading them, there is a specific page for fault codes. No, you also need to calibrate your TPS, this is very simple and in the instructions, I would recommend setting the TPS to % rather than voltage (option) as it seems to make more sense and easier to compare conditions etc, and you will get used to it and be able to pick headwinds etc from the TPS when you get used to it. Both are simple setups. From memory I paid a bit over 250 bucks when I bought mine, so will probably be a bit dearer now, but it is still well worth it for the instant info that is available, you will spend more than that on separate gauges. There is no way I could have gained my understanding of the LIMP phenomina under differing driving conditions without it.
-
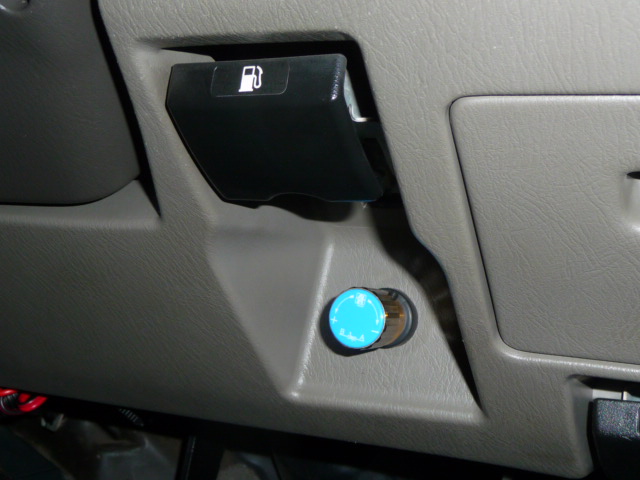
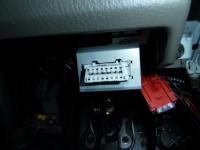
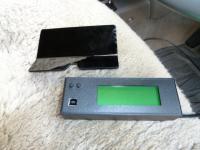
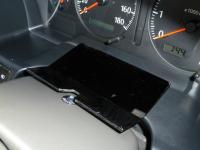
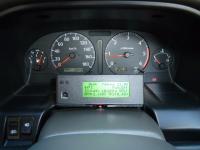
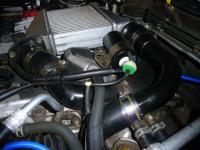
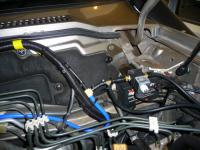
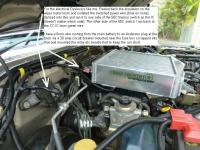
I hate drilling holes in a perfectly good car and I wanted the ECUTalk in plain view for analysing purposes. I got hold of some 3mm smokey polycarbonate from a signmaker cut it to shape and bent it using my wifes Craft heat gun, Using alcohol wipes I cleaned the area thoroughly (I use Arnorall) so my double sided tape would secure the polycarbonate piece in place, been there for some time now and still stuck like the proverbial s*** to a blancket. To get the cable through I just lowered the steering wheel as far as it would go and there was plenty of room to pass through. This bit of equipment has been invaluable in my understanding many of the ECU habits (including LIMP conditions), being able to read MAF voltages in real time, comparing TPS in varying conditions (In the pic TPS is set to voltage whereas I later set it to % much easier to evaluate), calibrating speed to a GPS, real time engine temps (although they don't move fast) and off course alt/battery charge. Also the 0-60/100 is handy for evaluating mods. ECU connection Plug under right hand side of dash Measured, cut and bent the smokey polycarbonate to suit the size and angle I needed also had to trim a section away as my cruise control LED site above the steering wheel housing Polcarbonate double sided taped into position, still strong today. The actual ECUTalk is double sided taped to the Poly carbonate as well ECUTalk in its final resting position and up and running Plugged into the Laptop via USB cable In action on the road
-
Damn you were a busy boy all I did was look at the temp wiring I did for my work light, and think about the hole I have to drill somewhere, Chaz's idea looks better each day but the bolt he drilled through has no load due to his spare being on the rear bar. decisions decisions..... bloody hell I hate drilling holes in a perfectly good car.
-
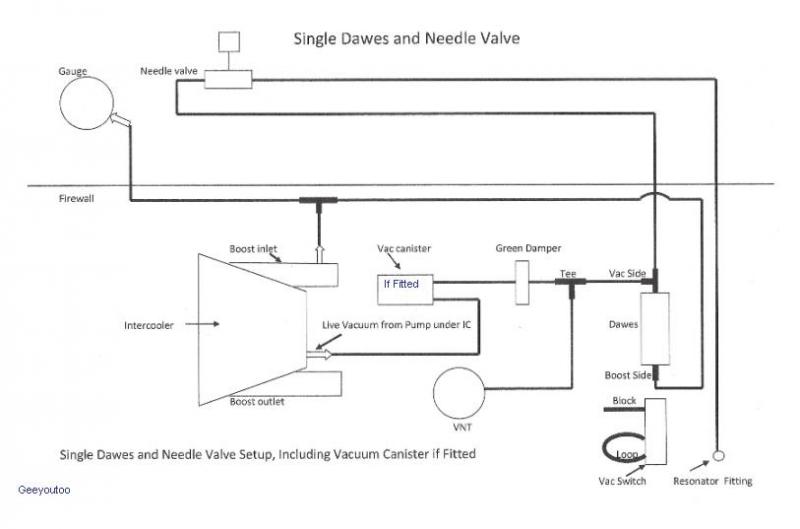
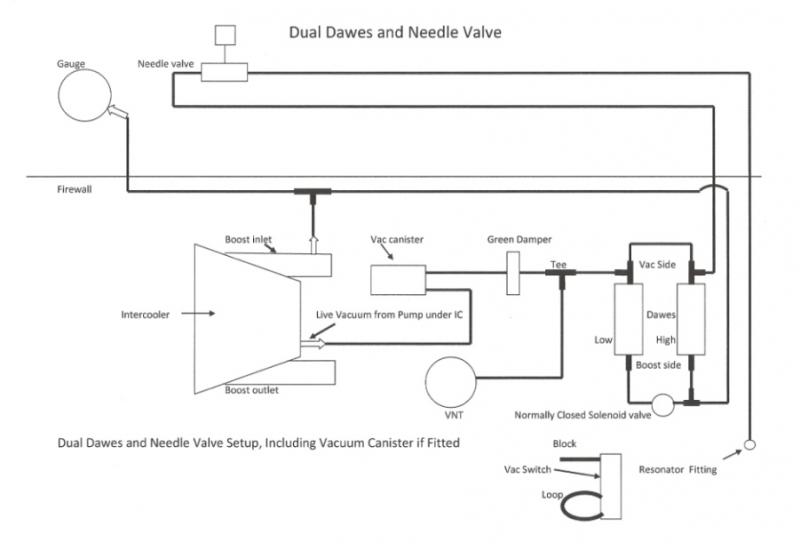
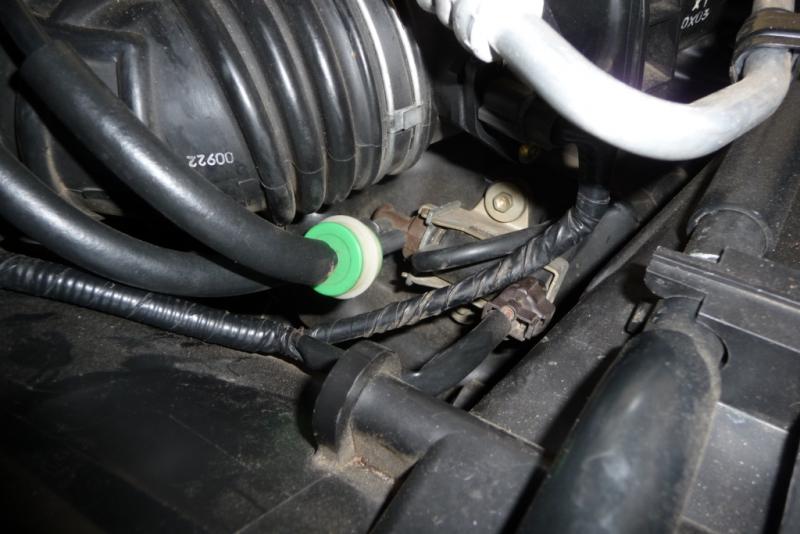
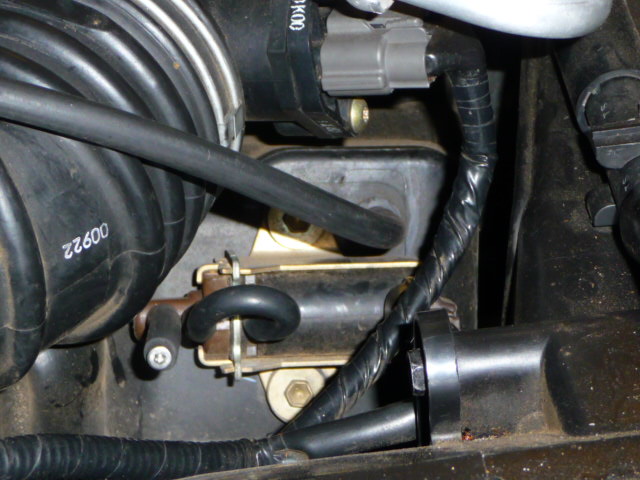
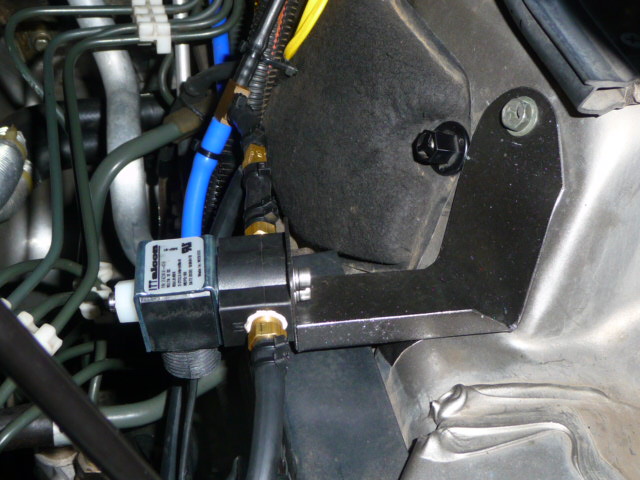
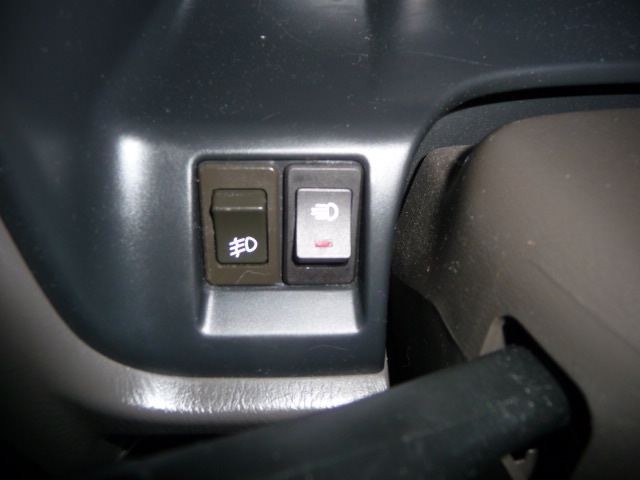
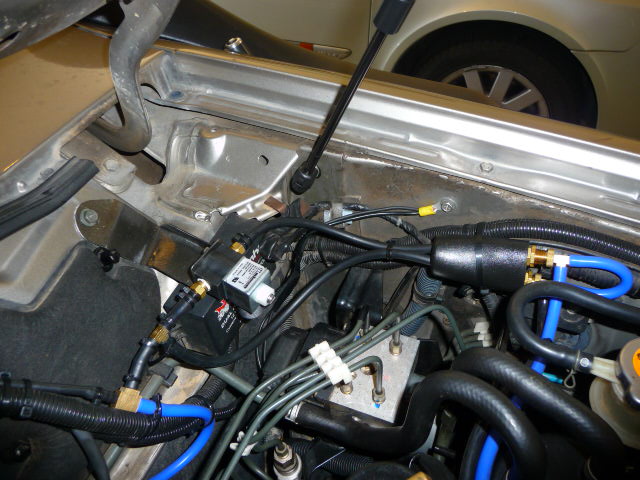
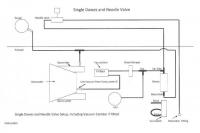
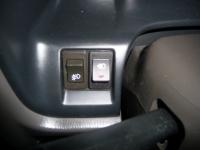
For anyone wishing to fit and tune a Dawes valve system. The following shows an in cab needle setup and single or dual Dawes valves. Single Dawes setup with early model vacuum surge canister, the tank is not really needed and often one of the barbs will break off so bypassing is OK, if you don't have one (around 2002/2003 it was deleted anyway) just go straight to the vacuum take off point under the IC This is the dual dawes setup, the same info as above applies to the surge canister, the solenoid that controls which dawes is selected is setup to default to the high boost side if the solenoid fails, this could be handy when doing a lot of towing This is the standard setup for ecu control of vacuum to the VNT through the ECU This is the bypassed vacuum switch giving more linear control of the VNT vac hence better boost control My personally prefered position for the boost take off point, easy access and easily protected Internal view of the fitting in the IC inlet pipe showing a smooth transfer External finished view of boost take off point Boost line from take off point is 4mm ID, the gauge usually has 3mm OD (1mm ID) tube, so a 3mm quick fit coupling was adapted to a 1/8th BSP barb fitting to make the transfer of size before the 3mm tube went through the firewall, The 3mm tube was pushed inside 6mm airline which made a protective shield before passing into the firewall Vacuum damper relocated as schematic Dual or single Dawes secured inside a rubber shield and cabled to the loom on the passenger side Location of needle valve in the cab, this hole exists and only needs opening a little, the needle valve has been fitted with 90 degree 1/8th BSP fittings for ease of tube attachment Fabricated a steel bracket to hold the dual Dawes solenoid to an existing threaded hole in the firewall Location of dual Dawes solenoid control switch beside driving light switch, picked up power from the cigarette lighter Dual Dawes solenoid and Dawes overview Dual Dawes Solenoid and Tube overview


-
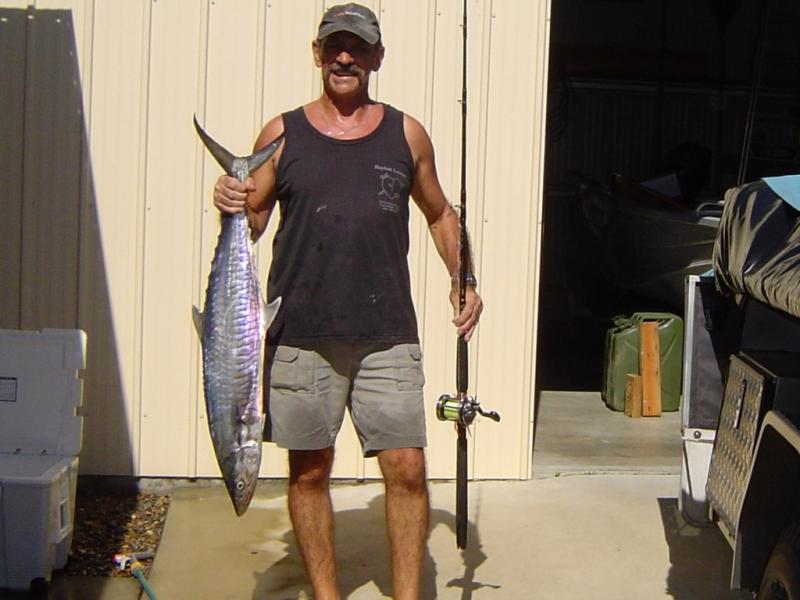
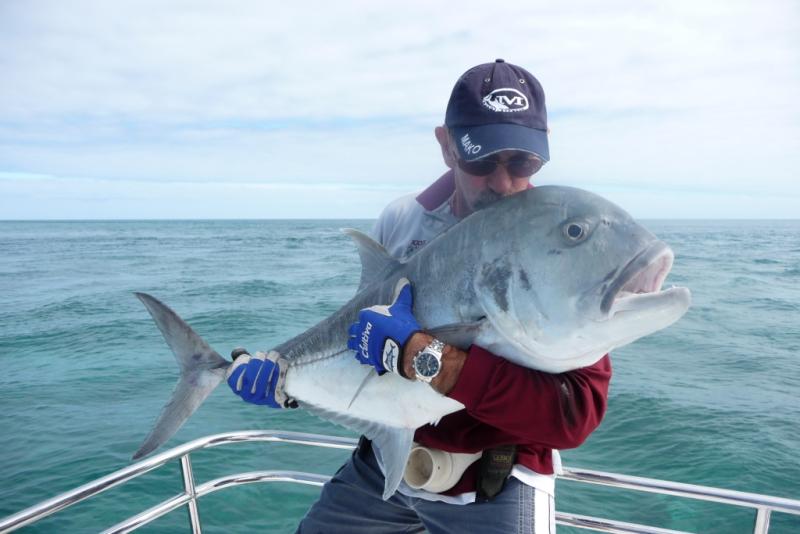
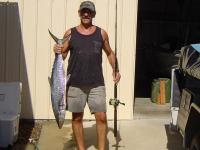
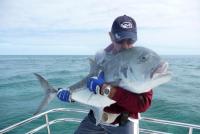
Did someone say Spanish Mackerel. Don't ya love the shorts in the second shot, they are my lucky fishing shorts, lucky people have let me live.
-
Is there a "Garage"? I'm damned if I can find where you put detail about your vehicle and what you have done etc.
-
absobloodylutely, torque and EGT, initially EGT was not noticed until I got it out on the highway and fully loaded, a recent trip to SA for a forum meetup, 5260k all up, fully loaded and a few big climbs (especially the climb out of Adelaide towards Bordertown, it's very, very long and reasonably steep) and the highest EGT I saw was less than 450C. And I achieved 9.7L/100 on that trip, the worst eco included the beach run to the head of the Murray and I got 12 on that section. So I'm happy, and we were carrying a lot of weight.
-
Adjusting the VNT initially sounds very daunting, when actually it is quite simple. A little care and forthought makes it light going. Usually 1/2 a turn down on the grub screw is enough to put you in the right spool up rate following an EGR block/exhaust upgrade etc. Generally we are looking for a spoolup rate of 5-6psi @ 1500 and 10-12psi @ 2000, this is just a guide not a hard and fast rule. Excess spoolup can result in long term damage to the turbo from cavitation and turbo shock. Hope this helps people trying it for the first time. Tools required: 10mm combination ring open end spanner preferably with a slight offset angle, a 2.5mm allen key, a pair of long nose pliers, 300mm of 10lb fishing line 30 minutes will se it done, and a bottle of Jack Daniels. With the engine cool tightly attach the fishing line to the VNT retaining clip, otherwise when it flies off you will never see it again and you will be going to Mr Nissan for new one as you won't know the size Push the clip off with long nose pliers Under the VNT head are 2 x 10mm hex head set screw, undo the rear one first then the front (otherwise the rear one will be pushed by the spring loaded diaphragm and make it a bit more difficult to keep the spanner on Slide the VNT rod off the retainer shaft and gently wriggle the head and rod to remove it upwards The head and rod removed I had a little over 1mm end float in the rod connection after 12 years of wear and tear, not sure what a new one has Clear view of the grub screw and lock nut, 1/2 a turn down on the grub screw is usually enough to get you in the groove Adjustment of the grub and lock nut, do this carefully so you don't lose where the original position was, loosen the lock nut just enough to turn the grub screw, do not take the spanner off as you want to ensure the exact amount you actually turn the grub screw in case you need to readjust later. Firmly retighten the lock nut in the new position, no need to overtighten as you can damage the grub screw head and lock nut With the fishing line still attache, push the circlip back into place with the long nose pliers, the damn thing could still fly off


-
There is a lot more back room stuff going on than you and I know about, so it ain't over yet by a long shot, we need to have a bit of faith in OldMav, Mat and the other guy's. They are trying their hardest and I'm confident in their ability to get there, today is just another hiccup in a long chain of events. If it does go belly up it won't be for the lack of trying and if it does stay up then we as a group need to do all we can to help these guy's keep it going.
-
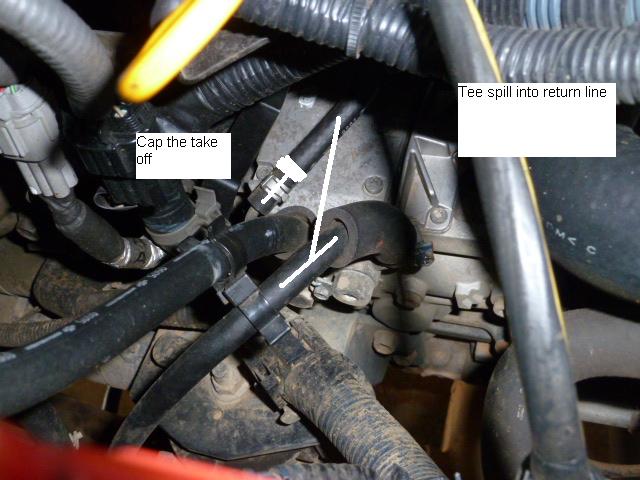
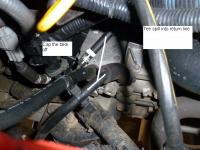
I have no expertise in 4.2's but with the ZD30's part of the spill line runs under the rocker cover and is not normally subjected to the varying pressures applied by a lift pump, on a bad day it may leak and fill your engine with diesel. This mod returns the bypass to the tank with the added benefit of cooling the return thus having slightly cooler fuel returned to the IP.
-
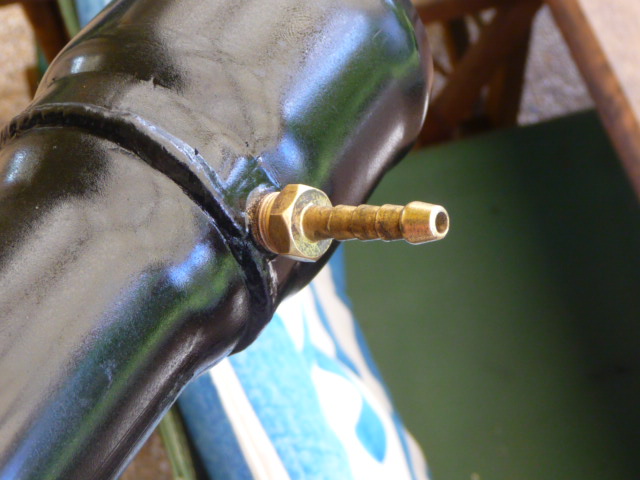
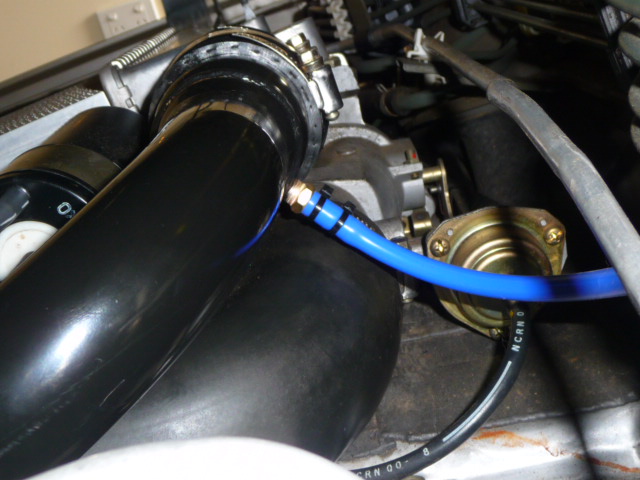
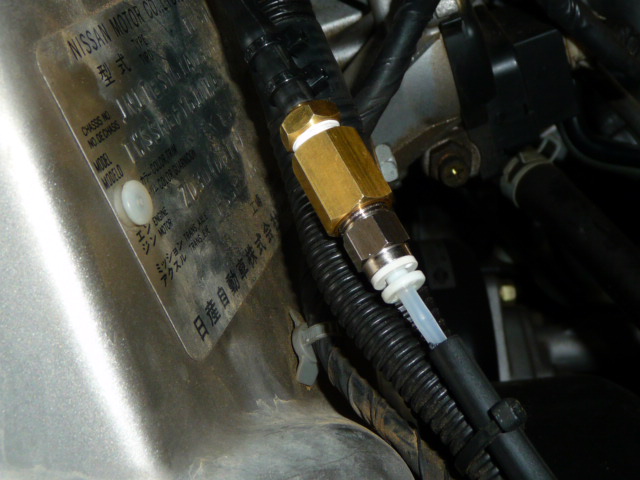
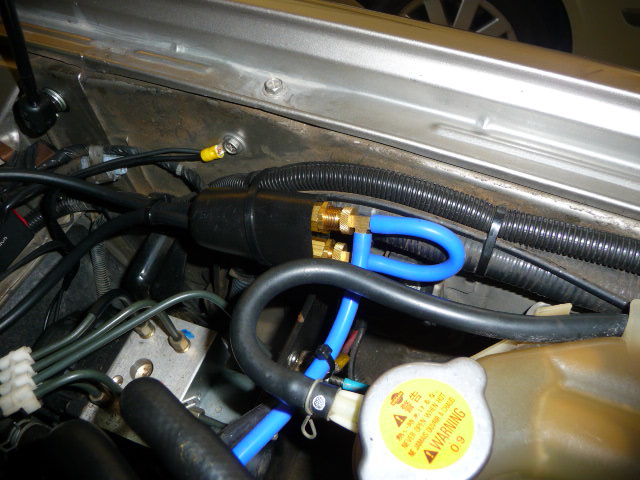
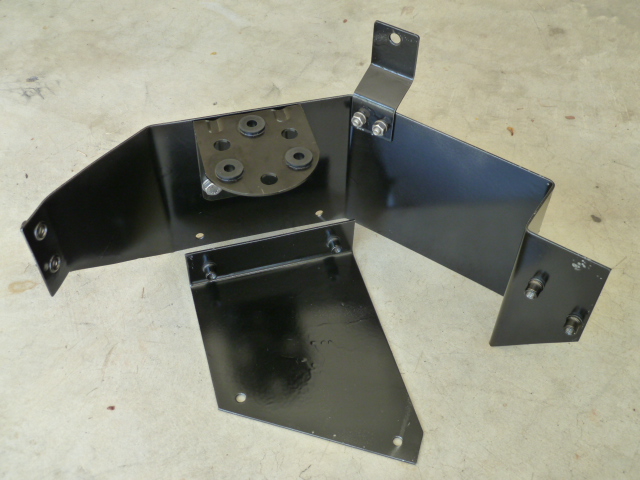
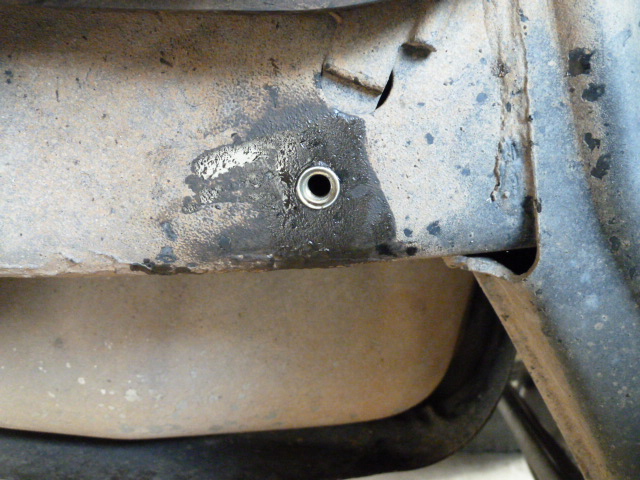
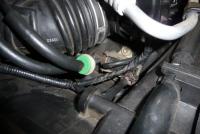
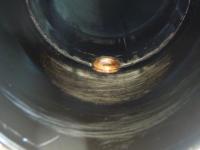
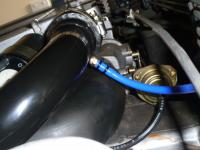
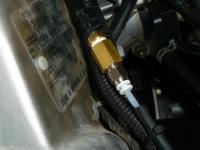
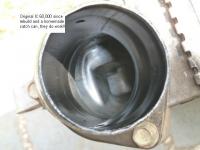
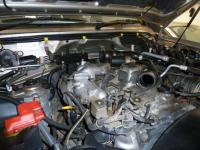
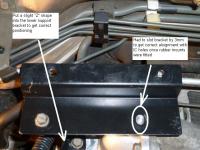
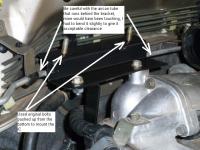
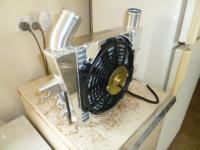
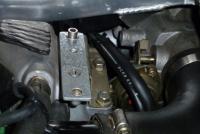
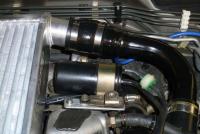
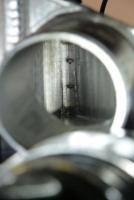
Fitting the Cross Country IC should be done with due consideration, follow the Cross Country instructions carefully with regard to what parts need to be taken off and not replaced, this is where most later problems lie. It is a large well made unit that only just fits, so double check everything to be sure. When removing the old IC check how clean the internals are, this will give an idea of how well your Catch Can is working. This was after 60,000k, when it was last cleaned, pretty good I thought The CCIC is a big unit, it only just fits. Area under the IC, ensure all bolts etc mentioned in the CC instructions as obstructions are removed With my unit I had to modify the mount plate slightly as shown, this is apparently not the norm A few other items to watch when installing bracket. I did not use the supplied bolts at the back I installed the original bolts in the rear from the bottom , this seemed the better option for me The fitted unit ready for wiring Front mount bolts as supplied, when refitting the original rubber mounts I applied copious amounts of silicone past (not sealant) to feed the rubber and keep it subtle. To remount the surge tank that is fitted to the early DI's I fabricated a bracket as follows using rivnuts and most of the original bolts As an option I mounted a 3 way valve on this bracket, it gives me the option of attaching a compound gauge into a spare line I ran thjrough the firewall to allow me to check my boost and vacuum calibration, maybe overkill but I had nothing better to do that afternoon EDIT: forgot to add, this is the internal view of the 50C thermo switch, it is just a contact area switch it does not protrude into the IC.


-
As I said there are a few very good people working in the background to find a satisfactory resolution, that will se everyone come out a winner and legally. I truly hope it works and I wish them all the luck in the world with there efforts. That does not mean this forum does not have a future, there is room for both.
-
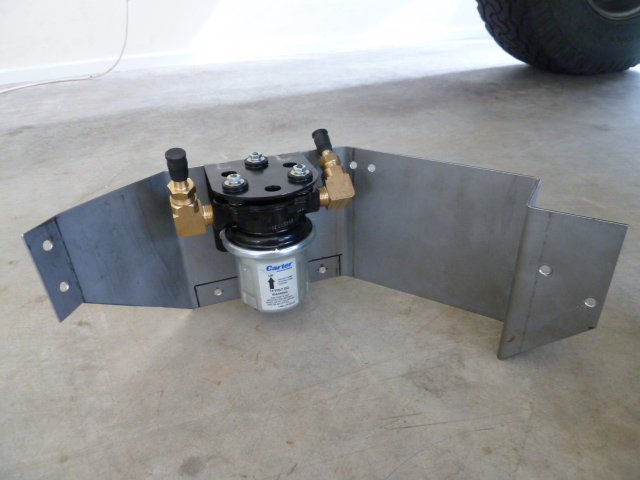
I looked at Fass very carefully while I was there, went to a Diesel drag meet where all the suppliers had stalls and picked up info from all of them, Fass are a great pump but definitly overkill for our purposes and mainly designed for the bigger engines. Honestly you won't go past a Carter for reliabilty and cost, soemthing like 10,000 hours life expectancy and they are rebuildable. The other is the Walbro FRD 11 also good. You can try Holley reds and blacks, there are some very good Gerotor pumps but all have their drawbacks. The other thing with some pumps is their compatability with the different fuels, the Carter handles both petrol and diesel very well, as does the Walbro.. I took all these things into consideration when making my choice Once again you will be hard pressed to beat the Carter as an all rounder
-
Settle down gentlemen, yes there is a problem with the forum after it dropped out this morning. After getting gobbledygook late this morning, it will not let me sign in now. There are people looking into it as we speak. The forum is still virus free no worries there. OldMav and others are doing a lot of work in the background that no one knows about or can appreciate how difficult it is, so just hold the phone for a little longer. We always have this forum to fall back on, but damn I don't want to lose all the info we have on the other, simply too much knowldege goes down the drain. I have met a lot of great people on the Patrol 4x4 forum to nice to walk away from just like that. Getting the right legal fix is not as simple as some may say.
-
In the Coral Sea a while back, as said going again soon, man it's awesome (and the ture meaning of the word awesome)
-
Looked at a lot of pumps in the States but didn't buy one, I only paid 108$ AU for it from Rocket Industries. so not a lot of difference really. But still worth a look if your going there anyway. BTW I put up my pics from the SA meetup for you in the march madness thread that Dronus had going on Patrol 4x4
-
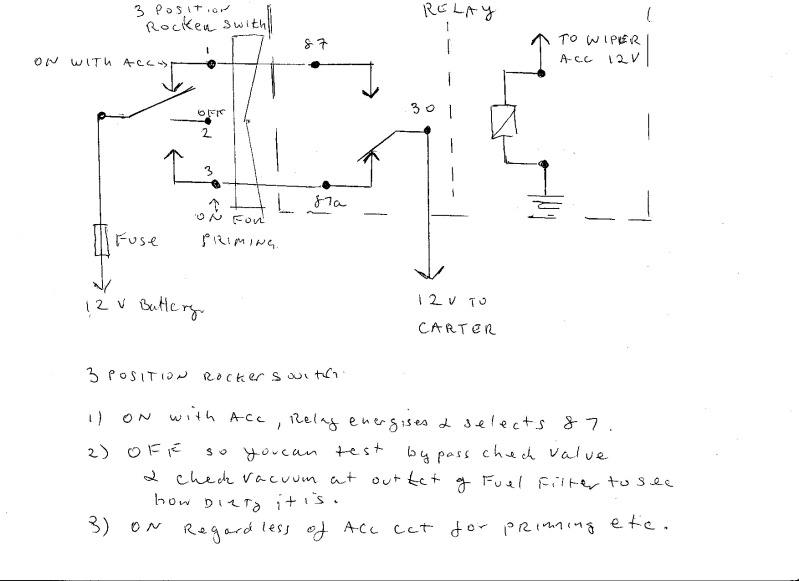
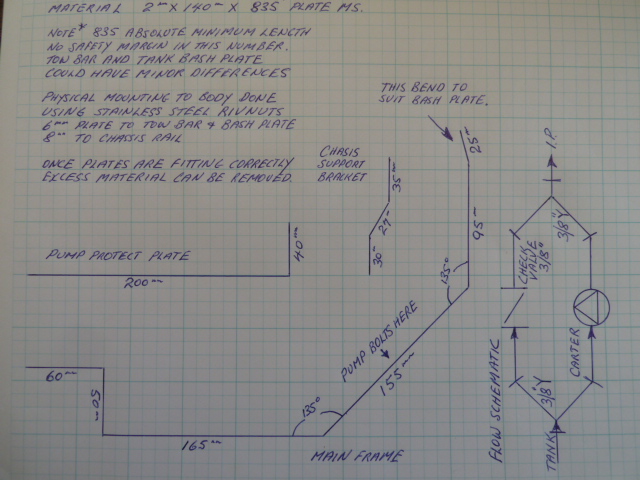
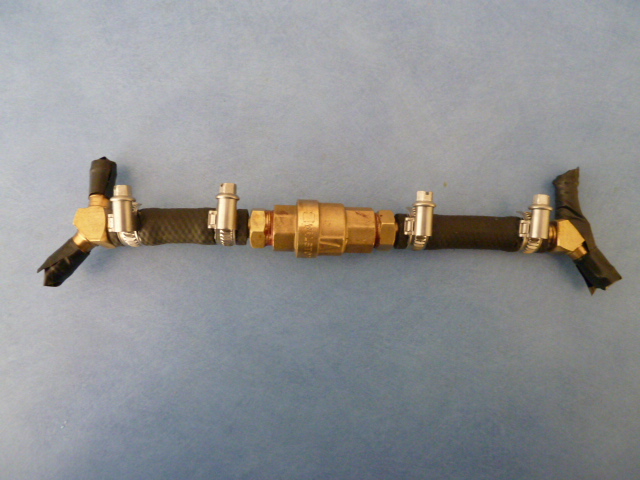
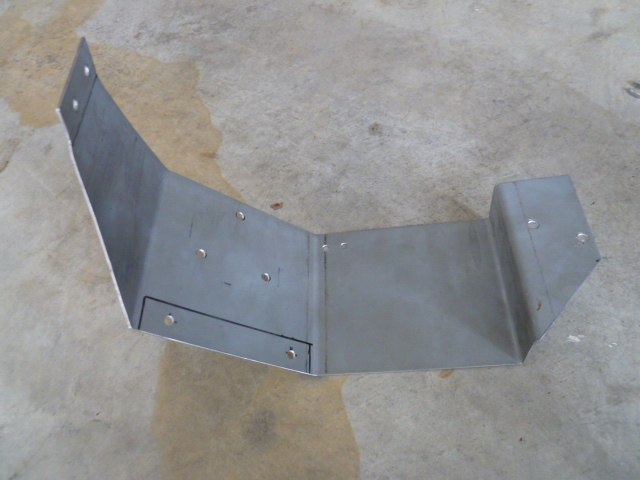
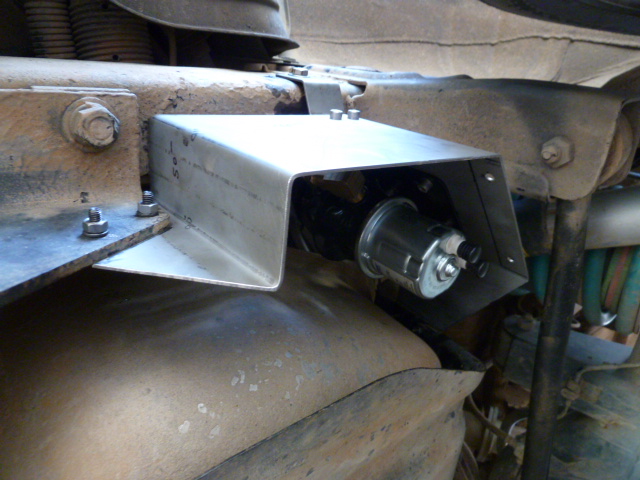
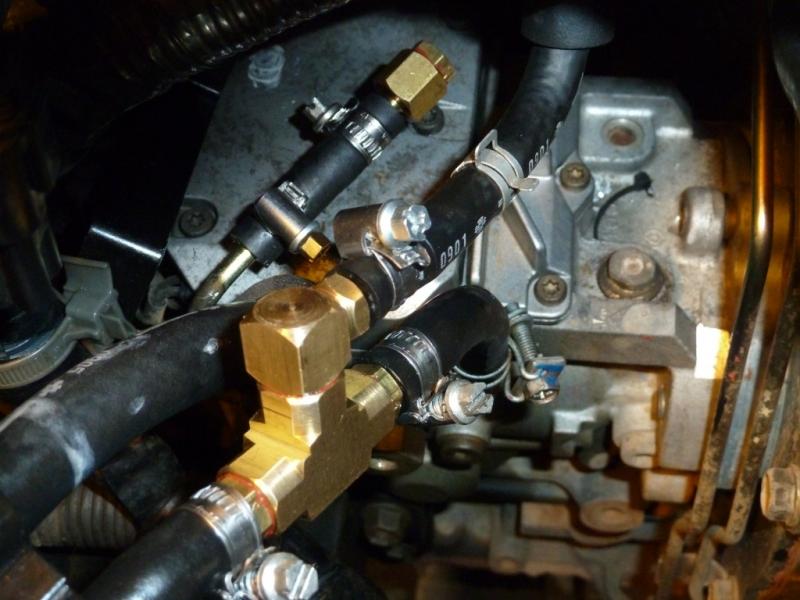
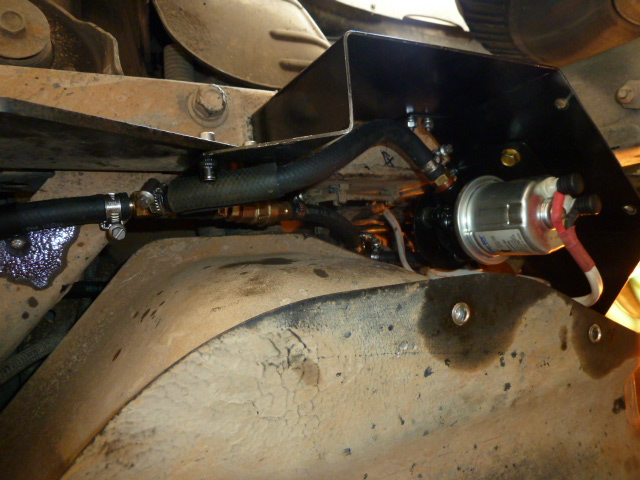
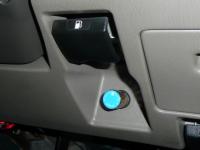
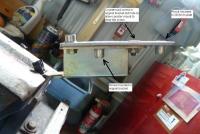
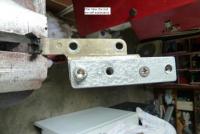
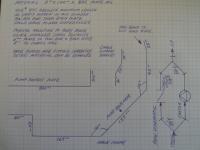
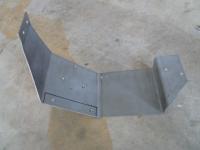
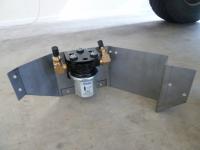
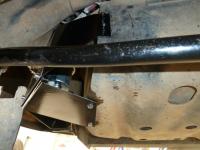
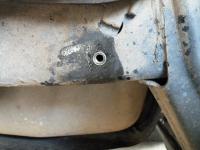
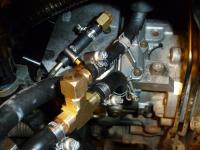
Just in case we do lose the other forum, I will try to move some of my tech info across, can't hurt will be a WIP for a while. This will be my first go here so bare with me......... Won't be quite as much written detail but I can put up most of the pics and captions I saved on my laptop. NOTE: No original fuel parts/lines were cut or modified in this exercise, this can all be undone and put back to standard with ease (well disconnecting the original fuel line after 12 years was not exactly easy, a few scratches on the hands were involved. Rocket industries supplied the pump, Good price actually, all fittings were from either Pirtek or Air and Lift Gear This is the wiring Diagram Whitie helped me on this (I'm an electrical dylexic, but I eventually get there) This is the pump frame layout with measurements and the b upass schematic Parts ready for assembly, eventually changed the bits I used on the spill line mod to get them more compact, used 90 dregree fittings for this Pump Bypas line with one way valve, this is used in case of a pump failure, still allows the IP to pull past the pump but stops the pump from pressurising the tank Pump Frame 1 Pump frame 2, with pump mounted to frame Pump frame 3, mounted to chassis, Tow bar and Tank bash plate (unseen in this pic) Pump frame 4, painted and showing chassis support bracket Pump frame 5, Showing tow bar mount position and pump protection plate mounted to the lower bash plate Pump frame 6, shows back mounting point to rear of the tank bash plate, also rear view of lower protection plate Pump frame chassis mount shows where I drilled and inserted a rivnut into the chassis to add extra support for the frame, there is quite a bit of high frequency vibration from the pump and I considered it worth installing this ectra security mounting Pump fully connected including bypass, Iput some rubber hose over and parts that could be subject to movement (I hate rattles and I wanted to protect them) I slid some 1" ID rubber insulation over the one way valve for the same reason. 3 way switch for pump operation, position one allows operation of pump when ignition is turned on for normal use. Position 2 isolates the pump completely, Position 3 allows manual operation from under the bonnet isolation and bleeding of filter when filter is changed. Proposed Spill line mod layout overlayed on standard setup Completed Spill line mod, Cheers Wow, that was time consuming


-
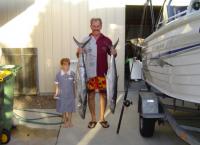
Well, maybe it's time to start a fishing section and see how it goes. I'll start it off with one of my best pics taken a while back GT fishing, doing another trip soon so will have more pics. For anyone who hasn't fished for these extremely tough, brutal monsters, the only thing I can say as an analogy would be throw a lure at a speeding freight trian and try to hang on. Can't wait to get back into it.
-
Just tried to log on to Patrol 4x4 and got the message server too busy, I joined here just in case but I gotta admit I love the original forum and have some good friends I have come to know through it. I know people say if certain parties come across they will bring that knowledge with them, that is true but often it is the historical data that is the problem, ie my EGT survey which has been going for years has a lot of data from many members, I could cut and paste it into a doc but damn I don't feel like doing that and then sorting the crap out of it. There are many threads with great history that would be lost in the event of a collapse, sad. There are many caring mods on there, it's a pity someone right at the top appears to have lost interest. Remember (I think it was mid 2010) there was a server problem and info for a couple of months was lost, I think I lost around 80 posts from memory. I'm not having any other issues since loading up with malwarebytes/Superantispyware and Spybot Search and Destoy to back up my AV.