bigrig77
Members
-
Joined
-
Last visited
Reputation Activity
-
 bigrig77 got a reaction from Rumcajs in BIGRIG77's guNew Millweld rear bar, wheel carrier and work light. Gotta say Millweld make a great quality bar. Sent from my iPhone using Tapatalk
 -
bigrig77 got a reaction from Bogmeister in I haven't gone anywhere...I really don't get what the big deal is, if u don't like a post or it's contents just don't comment on it , it's that simple! Concentrate on the positive posts people make and ignore the bad , the rest will sort itself out. ( common sense isn't so common )
-
bigrig77 got a reaction from Dye-04 in Off to the cape!!Well we've made it to the top!! I've stuffed me rear bumper( was expecting this) but drowned the troll at noelns. !! Spewin was my own fault wrong line and in the excitement didn't let my tyres down!!(was at 22 psi) Only water in the cab truck still going well ( air bag light flashing) hopefully will go once it dries out a bit. Stayed at cape Melville for a few nights caught a good feed of salmon !! Staying at loyalty beach now for a few nights , awesome spot ! Will post pics when I get home. Cheers.
-
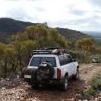
Hiya All
Thought I may as well whack some pics/info up on my truck.. I like it... but then again I am bias...
Brief run down...
2003 GU ST Patrol 3lt DI
Suspension/Tires
· Dobinson 4-5 inch springs
· Tough dog 9 stage adjustable shocks
· Superior engineering drop boxes
· Superior engineering panhard rods etc
· Sway bar disconnects
· BGF M/T’s 285 75 16
Engine
· 2.5 straight through exhaust
· TJM snorkel
· Oil catch can
· Intercooler fan
· BDS dual battery system
· Twin Hiclones
· Turbo timer
· Delphi water trap
Extras
· Nissan winch bar
· Runva 11,000lb winch
· Hella spotties
· ARB air locker
· Bolseys Rock Sliders
· Billett diff breathers
· ARB under bonnet air compressor – with air lead to front bar for tire inflation
· Coupler Tec electronic prevention
· Rear tow bar
· Rear Anderson plug
· Ironman instant large awning
· Rear camping light incorporated into factory lights
· Cargo barrier
· Roof pod
· 55 litre upright water tank
· Rear draws – wired with water pump and lights
· LED interior lighting
Communication/entertainment
· GME UHF radio
· Pioneer sound system with 6 inch screen and reverse camera
· DVD player
· 180 watt 3 way speakers
· Bluetooth mobile connection
· MY75 navigator
-
bigrig77 reacted to geeyoutoo in Geeyoutoo's Troll
-
bigrig77 reacted to TI_CRD_125 in Rear power panel for GUYet another variation on a theme.....
I ran power from the second battery to the rear yesterday for a fridge and whatever else. By spending an hour or so making the panel blank and sourcing the voltmeter and Merit sockets, I saved around $120 compared with commercial equivalents.
Panel is a piece of plastic around 2-3mm thick. I recycled an old document tray but anything you can get your hands on will be fine. Needs to be thin enough that the clips on the meter, switch and original clip will go all the way though.
Cable is two runs of automotive 6mm back to a fuse panel under the passenger kick plate. I also have a totally separate run along the chassis of 6 B&S for the Anderson plug to the camper.
Voltmeter is a two wire unit off ebay for about $7 delivered. Jaycar sell the same one for $25. When buying, it's easiest if it is a 2 wire, self powered meter rather than having to have a separate power supply. Switch is momentary action. I bought a 2-way thinking the existing lighter socket was easily accessible so I could measure the main battery voltage but it isn't.
Adrian
-
bigrig77 reacted to dronus4x4 in NADS step by step guideGUIDE STATUS - IN DRAFT.
Please check back for the full guide after I update this status.
-------
Howdy all. Just reserving this thread so that I can post an easy to follow, step by step guide to installing the Nissan Anti Detonation mods for all to use.
I'm just gathering all of the photos from my camera, taking some new photos and updating the parts and price list.
,..........
The Nissan Patrol 3L di engine can have a few modifications to make it more reliable and avoid the dreaded 'grenade'. This thread is not here to debate the reliability of the engine, or compare it to the 4.2 or petrol variants, its here as an easy to follow guide for anyone interested in doing the modifications.
I have done these modifications to about 10 GU patrols now, and while I'm not a qualified mechanic I reakon I have it down pat. Many thanks to Chaz for teaching me.
Any advice on this thread is just that - advice. I am not a mechanic so if in doubt ask first!
WHAT IS NADS?
NADS or Nissan Anti Detonation is a series of simple modifications that can be done to the di zd30 engine and exhaust to avoid the well documented issues with piston and engine damage.
....
WHY SHOULD I INSTALL NADS? (Short version)
There are 5 root causes for the zd30 engine failures.
1. Exhaust Gas Reticulation Valve (EGR). This valve recycles inert (but very dirty) exhaust gas back into the inlet manifold in an effort to reduce emissions. However the blank gunk deposited creates restrictions in the inlet manifold causing hot spots and starvation to mainly number 2 and 3 cylinders. See the install section for photos.
2. Oil Starvation. When the early engines came out, Nissan recommended that it only required 6 or so litres of oil. After a while they noticed many failures and "fixed" the problem by recalling the Patrols to shorten the dipstick. The correct amount of oil for the Di ZD30 is 8.3 Litres.
The modified length of the dipstick is (edit)cm
3. Overboosting. The ECU on the early GU patrols doesnt control the boost very well. The GU patrol has a Garratt VNT (Variable Nozzle Turbo). The way this works is - the pitch of the blades of the turbo are changed to create more boost at lower exhaust pressure. Think about how a turbo prop planes engine works. At a constant rev range the power (or thrust) can be increased, decreased or even reversed by changing the pitch of the blades. Like a fan!. The ECU has a pretty big job on its hands trying to control boost at the best of times - different engine revs, different load, the EGR opening and closing (which increases boost in the inlet manifold, after the turbo that the ECU doesnt know about). Nissan introduced an overboost sensor to try and over come this. It basically measures the boost (in the intercooler) and if it stays over a certain psi (it seems different for many sampled patrols) if puts the car into limp mode. You will know if you have limp mode if you are driving along, and all of a sudden if feels like you have no power. If you release the accellerator and reapply, it resets. Very annoying!
4. High EGT (Exhaust Gas Temperature). The Diesel engine is made to work. Good torque at low revs so you dont have to rev its guts out to get power. Its one of the reasons it is so fuel efficient compared to petrol engines) as a lot of the power is rquired just to get your 3T car moving! Obviously for the engine to run you need fuel and air and the combination of these can determine the temperature of the exhaust. Over fuelling or underboosting are common causes of high EGT. Why should i care about EGT? Well, at certain temperatures metals change caracteristics. They can get weaker (causing failure) or even melt! If your exhaust is glowing hot, think about how the pistons, cylinders, manifolds, oil and turbo are feeling!
5. Dirty or faulty MAF sensor. The MAF (Mass Airflow Sensor) is a small device located just after the air filter which measures the volume, speed and temperature of the incoming air. If the sensor is faulty, the ECU can over or under fuel the engine, causing high EGT and failure.
A common issue with MAF sensors is that they get oil on them. This is caused by the Crank Case Ventilation hose feeding back into the air inlet, just after the air filter. If you have a look on top of your engine, you will see the pipe coming from the top most part of the engine, it goes to the air inlet next to the passenger side battery. Oil mist causes the MAF to give incorrect readings. Regularly cleaning your MAF sensor, and fitting a good qulity catch can will certainly help. Its a simple thing that can be done relativly quickly. See the how to section for details.
WHAT PARTS ARE NEEDED? WHERE DO I GET THEM?
If you have read this far, you are probably keen to learn about what is included in "the mods" - Well here they are!
What - Boost Gauge
Why - Monitor what your turbo is doing. Easy to install, do it first.
Where- Get a good boost gauge. It is the foundation of knowing what your engine is doing. myPatrol4x4.com.au vendors section (when it appears), Ebay, Patrol4x4.com vendors section or even your localauto parts shop. Dont get the el cheapo one - you will find yourself replacing it soon enough. I have a Garratt Boost Gauge. You dont need one that goes into vaccuum.. mine does but it doesnt really matter.
What - EGT Gauge
Why - Monitor your Exhaust Gas Temperature. This is just as important as the boost gauge. You will be impressed with the feedback it gives you about your driving style!
Where - As above. I have a Auber digital gauge. I prefer the instant accurate feedback from the LCD display, but others prefer an analouge dial.
What - EGR "Shim"
Why - *CAUTION* Blocking your EGR is probably not legal in your state. EGR's can "Fail closed" . Blocking hte EGR not only helps to keep your inlet manifold and oil clean, it helps you to control the boost that your turbo is producing.
Where - myPatrol4x4.com.au vendors section (when it appears), Patrol4x4.com vendors section, or make one up yourself
What - Dawes Valve
Why - A Dawes valve sets the upper boost limit.
Where - http://3barracing.com sell them, as does some local 4x4 shops (at a outrageously inflated price, Shame!) If you have time get it direct from Darren Dawes at 3 bar racing - it might take 3 weeks but it might teach the local shops a lesson for being so greedy. We can also organise a group buy - post interest in the other section!
What - Needle Valve
Why - A needle valve controls the spool up rate of the turbo once we take away the ECU's control. "Spool Up" is the rate of increase of boost from the turbo. Too fast and you might get limp mode, too slow and you will lose power and have high EGT
Where - Dependable Distributors in SA is where i got my Italian Needle valve.
What - Catch Can
Why - To filter the crank case ventilation pipe, keeping the MAF sensor and intercooler clean.
Where - The Provent 200 is a great option, seems to work very well. Some people choose to buy cheaper catch cans with varied success in catching the oil mist. Have a look on ebay, or http://www.westernfilters.com.au - the kit comes with most needed things.
What - Exhaust upgrade
Why - Having a less restrictive exhaust improves performance, and lowers EGT
Where - Most exhaust shops can knock something up, but i preferred to spend a bit extra and get a 2 3/4" Beudesert mandrel bent exhaust. The Catalytic Converter is 200ccm and it makes an impressive difference.
Other Items that are not high priority, but make life better
What - Intercooler upgrade
Why - The standard Nissan intercooler has crimped ends. They will leak over time, its a common problem.. If this is happening to yours, you may notice black stains on the fins near the ends, or an unexplained loss of boost. Neither are good for your engine
Where - If your wallet is bulging and you have 10 weeks up your sleeve to wait grab a Cross Country intercooler. ASETurbo are just down the road, they are cheaper and normally have them in stock. They also come with all new pipes and a fan. A few other places also recore intercoolers on ebay etc. When mine dies, ill go the ASE i think..
....
WHERE DO I START?
So you have decided to go for it! Congratulations! It might seem daunting at first, but if we break it into chunks and take the time to learn what we are doing and why, it will make it a great learning experiance.
Here is the order of how i would go about it... In the next post ill start to describe, in plain english with photos, how to eat this elephant!
1. Fit Boost Gauge.
2. Fit EGT Gauge
3. Fit Catch Can
4. Fit boost control
In between each step i encourage you to DRIVE THE CAR and observe how each change makes a difference, more on that to follow..
-
bigrig77 reacted to Ray! in GU Rear Door TableWell, I finally got around to making the rear door table for the Patrol, after lots of planning and sourcing of materials. The total build time was around six hours, but there was also a bit of waiting for glue to dry and running around for bits and pieces, so the whole project took about three days.
I wanted to make something slightly different to what others have made, so that the look is as close to factory as I could reasonably achieve with my limited workshop facilities (read basically none). This project was literally created on a Black and Decker foldout work table, and the kitchen and dining room tables (what I wouldn't give for a proper workshop.
Here's the final result and I'll post the stages in a separate post. The only thing that I'm not satisfied with is the closing mechanism (currently a spring drawing together the wires that support the table); I'll be looking for something neat that I can use for a better lock. I'm also still tossing around what I want for the top of the table. The splashback is intentionally white so that it will reflect light onto the table. The total cost of this table is $91.51 in materials and consumables.
This is what it started with, a sheet of 3mm thick aluminium:
Then it was off with the existing liner to trace out the shape and mark the holes for the plugs:
Once the shape and holes were marked (I used a pin vice first to mark the holes through the vinyl, so that it didn't leave any marks on the liner, and then centre punched the pin marks), then I outlined the cutout for the table:
Once the holes were drilled and the centre cut out, I was ready to start the lining. Cutting out the centre piece was the most frightening thing, as one slip and it was start again. I used a 4" grinder with one of those 1mm thick cutting wheels to cut out the table. A note for those who may try this, when using one of these thin cutting wheels, don't try and cut through immediately, just gently move the wheel along the cutting mark, using a piece of staright steel or timber as a guide, and let the weight of the grinder work its way through:
Time to test the farme on the door to ensure I got everything right. Spot on:
Time to position the hinge and table on the frame. This was just a test to ensure that everything fitted correctly:
The final stages involved gluing the matching vinyl to the frame and table. This took a bit of planning, as again, I didn't have any second chances to get it right. Yes I could have cut more vinyl, but then there was a huge mess of contact glue to clean off. This is how the frame came out and the table was much the same, so not point in additional shots:
I stuffed around with various loking mechanisms, including velcro, but eventually ended up with this:
It all works a treat.
Cheers
Ray
-
bigrig77 reacted to Ray! in EGT Gauge for CRDI decided to install the EGT Gauge in the Patrol after I went to a wrecker and found out what the dump pipe actually looked like and figured out that the conversion would be pretty easy without having to remove the pipe etc. At first I was going to buy a dump pipe assembly from the wreckers and modify that and then just swap over the pipes once the work was done; but that wasn't necessary.
The first part involves removing the heat shield from the turbo. This wasn't initially as easy a task as I thought, with some of the bolt seized pretty tight and not much room to swing a spanner. First move was to WD40 all the bolts and within minutes, they just tweedled off. One word of note to those who tackle this task, you don't need to remove the bolt that sits just under the rubber hose where the water pipe goes (centre right under the air-con pipe in the first photo).
The shroud was a bugger to wrangle out from its resting place, but once the right moves were made, it came out fairly easily and replacement wasn't too difficult either, though I removed about a 5mm sliver of metal from either side where it curves around the vacuum diaphragm and that made subsequent installation and removal very easy).
This is the EGT kit that I bought. It consists of the pyrometer probe, control box and digital display. The kit also came with two types of fittings for the probe, a standard nipple that could be welded onto the dump pipe and another nipple already welded to a screw clamp (next photo). As I didn't want to remove the pipe for welding of the nipple, I used the provided clamp.
This is the nipple and clamp positioned over the dump pipe while I worked out the best location before drilling the required hole. What you can't see in this photo is the other side of the nipple. It isn't flat, but has a tapered nozzle that sits inside the drilled hole and provides a tight seal what the clamp is tightened (otherwise this setup would be useless).
The next part involved measuring and locating the right place to the hole in the heat shield and, as I'm the world's greatest at measuring things, the hole naturally was completely off on the first attempt. That's the reason why the shield came off around six times, as I had to keep filing away until the nipple was fully exposed and things could be attached.
This is the final setup with the nipple and Swagelok in place (and the hole looking somewhat meaningful). Everything bolted back nicely and it was now time to feed the probe through the firewall.
There's one thing that I wish every vehicle manufacturer would do and that's install a bloody big grommet, somewhere easily accessible, so that you don't have to fight every inch of the way to pull through cables etc. The probe added extra complexity, as it was a rigid piece and had a right angle to boot. At first I was somewhat worried that I'd damage the probe pushing it through the only reasonable opening in the Patrol, but then I thought, it's going to be living in hell for the rest of its life, so poking its way through some rubber and insulation is hardly an effort. So the final assembly went fairly easily, once I'd managed to work the probe through the firewall.
This is the gauge display and location. It was very easy to install, as all that was required was to connect the wires from the control box and gauge display together, route one to earth and one to switched power and all was good. It's very easy to read where I've located the display and quite unobtrusive in the overall scheme of things; I like things to be understated and almost unnoticed when I put something in any of my vehicles.
The gauge works well after a short test drive and I'll be really interested in what temperatures I get while with and without the camper. The thing I already noticed even in the short drive was how quickly the temps rise and drop, doing 60kmh in overdrive raises the temps compared to doing the same out of overdrive.
The EGT Gauge that I bought was from: http://www.dynotunen....?idproduct=134
Cheers
Ray
-
bigrig77 reacted to Oldmate in Oldmate's 01 GU WagonHi guys. May as well start a thread for my car as I never did one on the other forum at all. So this is it when we got it mid 09. Had sagged 2" tjm lift , snorkel and dual batteries on a manual isolator.
-
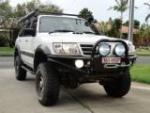
bigrig77 got a reaction from Evil! in BIGRIG77's guhi all .
thought id show you my rig will add more pics later.
2004 GU111 ZD30
Tune it chip , 3" mandrel bent zorst , water to air intercooler , full NADS.
4" tough dog adjustable shocks , springs and coil over steering dampener , front n rear adjustable sway bars , superior drag link , diff breathers, superior sliders , km2 muddies , xrox barr , winch, light force spotties x 4, fridge ,drawer system ,dual batt, polaris,ecutalk,uhf rhino racks , side awning and other stuff i can't think of right now. hope you like it, i know i do! cheers.